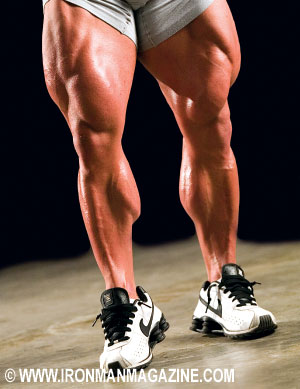
 I’ve observed over the years that most people, athletes and nonathletes alike, take their ankles for granted—that is, until they injure one. Then they fully comprehend just how vital ankles are to their well-being. Simple everyday tasks such as walking and climbing stairs suddenly become very difficult, and participating in any type of physical activity is out of the question.
Whenever strength athletes hurt an ankle, they discover how great a role that joint plays in a wide range of exercises in their routine. Obviously, ankles are involved in squatting and every type of pulling movement, but who would have guessed that a dinged ankle would also have a detrimental effect on inclines and flat benches? When lifters are unable to establish a firm base with their feet before benching or inclining, they can’t bring the power up from that base into the bar. Of course, overhead work is also not feasible when someone is nursing an injured ankle.
Basically, movement depends on sturdy ankles. We need them to walk, run, jump and move in a variety of directions. When I approached 40, I decided that I needed to do more for my cardiovascular and respiratory systems. After moving to York, Pennsylvania, I made a point of doing some cardio for my Olympic lifting training regimen. I regularly played racquetball and volleyball at the York Y and practiced with the York College soccer team. Later on I ran on the wide, sandy beaches of Santa Monica and on the track at the University of Hawaii, although never more than a couple of miles.
My goal was to run 10 miles a week, six on Sunday and four on Thursday, my nonlifting days. That’s when I became aware of the importance of strong ankles. During my first six months of running I sprained my left ankle three times. It puzzled me why it was always my left ankle because both were doing the same amount of work. Finally it dawned on me that my left ankle was weaker than my right one. I think that’s true for everyone. One leg and one arm are generally stronger than the other leg and arm, mostly because we unconsciously give it priority. I added some strength work for my left ankle and didn’t sprain it again.
Those minor injuries made me aware of how dependent I was on my ankles and how much they were involved in my strength training. All my lifts fell off while I was rehabbing a sprain, and it took another six weeks to move back up to my former numbers once it was fully recovered.
The ankle is a marvelous structure. It is responsible for stabilizing the lower leg and foot and for all movements of the foot. It’s a hinge joint formed by the articulation of the two bones of the lower leg, tibia and fibula, along with the talus, a knoblike bone that sits atop the calcaneus, or heel bone.
The ankle is secured with an interlacing network of ligaments, tendons and muscles, which enables the foot to be lifted, turned downward and rotated from side to side. Its design is amazing, extremely complex yet simple in purpose. Because there are so many tendons and ligaments in the ankle, size isn’t a variable in terms of strength. That’s why we’ve all seen powerlifters or strength athletes with puny ankles squat huge poundages as well as athletes who seem to be able to soar upward almost effortlessly with ankles the same size as their wrists. The size of your ankles is determined by genetics, but it is within your power to make them considerably stronger, and that’s all that matters.
Late one night I was flipping through the channels seeking some program worth watching when I came across a PBS station out of Camden, New Jersey, that was running a show dealing with rehabbing athletes—my cup of tea. It was about preparing Chinese athletes for the upcoming Olympics, and all the subjects had some type of lower-body injury. Most were dealing with some kind of knee or hip problem, but some had pulled hamstrings and adductors. What caught my attention was the very first thing the therapist did in every case: exercise the athlete’s ankle on the injured leg. None had hurt their ankles, yet that was where the therapy began. The therapist or trainer would flex and rotate the ankle for quite a long time. After a brief rest, he’d do it again.
That intrigued me because I knew that when someone in our country is rehabbing a knee or hip or injured leg muscle, nothing is done directly to the ankle. In fact, the ankle is left to fend for itself. It dawned on me that what the Chinese were doing made perfect sense. Exercising the ankle vigorously did two positive things: 1) It brought nourishing blood to the injured area as it passed down through the leg on its way south, and 2) it helped strengthen the ankle joint. Making it considerably stronger in the very early part of the rehab process enabled the athlete to move on a stable joint during the other phases of his recovery much sooner
So now, whenever I feel as if my knees, hips, quads, adductors or hamstrings need some direct attention, I begin exercising my ankles at night, while reading or watching TV. All I do is extend my foot, rotate my ankle and extend it up and down until it gets tired. I rest and do it again, often a dozen times. At my next workout, I make sure to hit the groups that are connected to the ankle. I’m referring to the muscles that form the lower leg: soleus, gastrocnemius and tibialis anterior.
Since I’ve done articles on the calves in previous issues of IRON MAN, I won’t go into detail on how to strengthen them, but I will review the main points.
The calf is formed by the larger, more prominent gastrocnemius and the smaller yet no less important soleus. The gastrocnemius originates above the knee, at the rear of the femur, the long bone of the upper leg. Two tendons extend down, to where they help form the Achilles tendon, and insert at the posterior of the heel bone. The gastrocnemius is a prime mover of the foot, and it assists in flexing the knee.
The soleus lies directly behind the gastrocnemius and originates at the upper parts of the backs of the two bones of the lower leg, the tibia and fibula. Then it extends downward to aid in forming the Achilles tendon and attaches to the heel bone. It also takes part in all foot movement.
The two calf muscles work in harmony, forming a functional unit known as the triceps surge. However, similar as they are to one another, there’s a difference between them, and understanding it will enable you to make them both a great deal stronger. Observant readers may have already spotted the difference. It has to do with where the two muscles originate.
Because the gastrocnemius originates above the knee, it’s strengthened when you do exercises with locked legs, as in standing calf raises. In contrast, you hit the soleus directly when you do calf raises while seated, as it originates below the knee. That’s why it’s so helpful to learn some basic anatomy and kinesiology. Little points like the ones I just mentioned can make a huge difference in overall gains.
Knowing about the two calf muscles is why I recommend doing both versions of calf raises—seated and standing. You can do one type in a calf workout and the other the next time you work your calves. Or do two sets of each at the same session. If you want results, you have to punish your calves. Staying in the comfortable range just doesn’t work for those weight-bearing muscles. Higher reps are in order—30s for no fewer than three sets. The final dozen reps should make your eyes water. Be sure to always stretch immediately after each set and again later that same night.
If calf machines aren’t available, you can still do standing calf raises by placing a barbell on your back and fixing the front of your feet on a two-by-four. The movement requires a certain amount of balance, but with a bit of practice you’ll be able to make your calves scream. That’s how all weight trainees and bodybuilders built their impressive calves before the machines came along. To do seated calf raises, sit on a bench or chair, place a towel or pillow on your thighs, and stack some plates on that. Again, fix the front of your feet on a two-by-four or phone books. That will give you a greater range of motion. Others prefer to hold a dumbbell in one hand and work one leg at a time.
To really put a jolt into your calves, get inside a power rack and set the bar at a height where you’re standing fully erect. Now place the second set of pins three to four inches higher. Extend up on your toes, lock the bar against the higher pins, and do an isometric contraction for 10 to 12 seconds. As you get stronger with the movement, increase the weight on the bar, but keep the isocontraction to 10 to 12 seconds. Although I’ve never done a seated iso for calves, I can’t think of any reason it can’t be done, so you might want to give it a shot.
Any pulling exercise that requires you to extend high on your toes is also good for strengthening the calves. Power cleans, power snatches, full snatches and full cleans, snatch and clean high pulls and shrugs come under that heading.
While all the exercises I’ve discussed will certainly take care of the gastrocnemius and soleus, the front portion of the lower leg also needs direct work. That’s the tibialis anterior. I’m aware that many more muscle groups run down the front of the lower leg and extend into the ankle and foot, such as the peroneus tertius, extensor hallucis longus and extensor digitorum longus. The tibialis, however, is by far the largest, and when you work it, you hit all the rest.
I’m frequently called retro in my selection of exercises, and I’m guilty as charged. Some of the very best exercises have been forgotten, or the equipment is no longer available, yet many are tried and tested and are still useful. I’m going back to the ’30s and ’40s for this one. Older athletes will recall the Iron Boot—I’m betting that they all used it at one time or another. I did too, although only long enough to see how to perform a number of exercises with it. It was effective. The trouble was, it took time to attach it to my shoe and make sure the weights were secure. I didn’t want to spare the time when I was younger, but that isn’t a factor now.
I believed that the device no longer existed, yet I was proven wrong. Last Saturday on a visit to the York Barbell Museum with Daryl Goss, I ran across them in the store. For those who don’t know what I’m talking about, the Iron Boot is basically what the name implies—a piece of metal that attaches to your shoe onto which weights can be added. It’s a very simple but effective device that you can use to work every part of your legs, including your tibialis.
Secure the boot to your shoe or over socks, extend your leg, and move your foot up and down, up and down until the front of your lower leg tires. Rest and do it again. You can do both legs at the same time or one at a time. I believe one at a time is more beneficial because you don’t have to worry as much about balance.
The Iron Boot is also useful in strengthening the ankle itself—just rotate your foot in circles. You’ll find that you need only very little weight added to the boots for them to work. Sometimes the boot itself is sufficient.
Ankle weights that are attached with Velcro are easier to use and accomplish the same purpose. Their only drawback is that you need quite a few of different poundages if you want to increase the resistance. Adding more resistance to the Iron Boots is no problem. If you use ankle weights, don’t attach them to your ankles. Attach them your foot. Then you can attack your tibialis and the rest of the groups in your ankle quite readily.
Those two pieces of equipment are great for use at home. If you train in a gym that has a leg press, you can really overload your tibialis and neighboring groups in the front of the leg. Position yourself in the machine so that your leg is straight. You should start off using very light resistance until you get the feel of what you’re trying to do. The resistance needs to be light enough to give you complete control yet heavy enough to work the target muscles thoroughly. Keep the reps relatively high—20s to 30s for three sets per leg. You can do them with both legs at the same time, but I’ve found that working only one leg at a time is more productive.
While many gyms don’t have a leg press, nearly all have leg curl machines, which you can use to strengthen your front leg and ankle. Sit on the end of the machine, hook your toes under the pad, and proceed to lift them up toward your knee. Same deal on sets and reps: 3 x 20-30.
There are also machines designed specifically for exercising the ankles, such as the one shown on page 169 of The Strongest Shall Survive. They’re generally found in rehab and physical therapy facilities, but I’ve come across a couple in commercial gyms. If you happen to have one at your disposal, by all means put it to use. It’s most effective because it works the front, back and both sides.
These exercises are also very useful for anyone who’s rehabbing an injured ankle. Keep them in mind if you happen to ding an ankle in the future.
Many of the basic exercises in any strength routine help strengthen the ankles. Front and back squats, deadlifts, heavy shrugs and lunges involve the ankles to a large extent, so they’re strengthened during the performance of those lifts. Any exercise that requires a heavy poundage to be supported by your body is going to work your ankles. I’ve found walking lunges to be especially good in that regard. The balancing factor forces the ankles to extend themselves more than in conventional lunges or even squats. I know that’s the case because after I’ve put athletes through a vigorous session of walking lunges with heavy dumbbells, a majority of them tell me that their ankles got as sore as their hamstrings and glutes. Soreness means that the muscles and attachments were hit directly.
I was recently asked if partial squats had a place in a strength program. They do because you can handle a great deal more weight, which forces the lower legs and ankles to work much harder in order to maintain control and balance. Instead of doing half or quarter squats, which I believe breeds bad habits, I prefer heavy supports inside a power rack. By heavy I mean working up to a weight that’s twice as much as you can use on a full squat.
The week following the strength test at the end of the off-season strength program was when I had my advanced athletes do those. Primarily, I wanted them to learn what was involved in supporting a massive amount or iron. Plus, it gave them a certain amount of prestige with their teammates; I allowed only a few athletes to take part in the exercise. They quickly discovered the importance of staying rigidly tight. Let one area of the body relax even slightly, and the bar will jump off your back. That’s why I had them work inside a power rack, which meant there was no danger of their getting injured. With that amount of weight I don’t care to risk using spotters.
You should position the bar at a height where you have to move it three to four inches to lockout, then control it for five to six seconds. I have athletes do a light warmup set of squats, then begin the supports with their best back squat. To qualify to do the supports, the athletes must be using 500 pounds or more. So they would start with that number, then jump 200 pounds. If that’s easy, they move another 200, but if it’s testy, they take a 100-pound increase—and so on until they find their limit.
Besides staying extremely tight, lifters have to learn to ease the bar off the pins. Most try to jerk it upward. That invariably results in the bar’s being a bit too far back or too far forward, and it crashes back on the pins. The body has to be perfectly erect, and the eyes have to be forward. Looking up or down adversely affects the line as well. I tell them to think about grinding their feet down into the floor to establish a solid base, then to bring power up from that base into their legs, glutes, hips, back, shoulders and, finally, into the bar. All the while they must be sure that every muscle is tight before they squeeze the bar off the pins.
If the bar moves out of the proper alignment, it will either feel as if it’s been welded to the pins or run forward or backward. When someone is handling close to a half a ton, the weight doesn’t hang around long enough to allow for any adjustments.
I had several athletes who handled more than 900 pounds and three who exceeded 1,000, which is heady ground for any strength athlete. After they’d limited out, I’d lower the weight considerably and have them support that poundage for a 20-to-30-second count. At their next squat session they always improved, stating that the weight that used to feel so heavy actually felt rather light. That’s because they’d overloaded all the groups responsible for supporting a heavy poundage, and the most important areas of all were the lower legs and ankles. Without that stable base, nothing else really matters.
What else can you do to strengthen your ankles? Get in motion. Sit less; stand more. If you’re still young—and some 45-year-olds are—participate in activities that force your ankles to work harder, such as basketball, soccer, volleyball, tennis, racquetball or cycling and running. If you qualify for a senior discount, just walk. Long hikes over rough terrain make your ankles do extra work to maintain balance, and that’s a good thing.
Keep in mind that an ounce of prevention is still worth a pound of cure. Keeping your ankles strong will help you live an active lifestyle as you grow older. So make a place in your strength routine for at least one specific exercise for your lower legs and ankles, along with lots of other exercises that include them in the execution of the movement. The long-term benefits are well worth the effort.
Editor’s note: Bill Starr was a strength and conditioning coach at Johns Hopkins University from 1989 to 2000. He’s the author of The Strongest Shall Survive—Strength Training for Football, which is available for $20 plus shipping from Home Gym Warehouse. Call (800) 447-0008, or visit www.Home-Gym.com. IM










You must be logged in to post a comment Login